
事件处理
实现步骤
- 关联控件(如按钮)
- 设置控件事件监听
- 在监听接口添加事件处理程序
- 实现接口时,需要重写方法
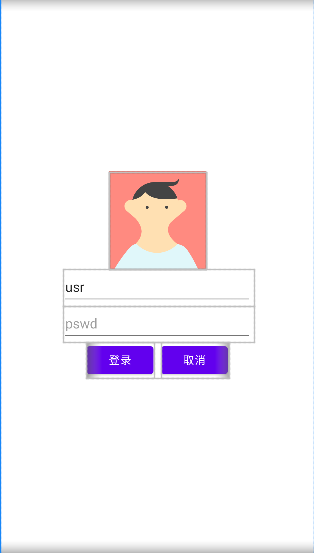
以登录页面为例
1 |
|
事件一
当点击登录按钮后,跳转到登录成功页面
首先登录按钮需要设置OnClickListener监听,当按钮被点击,通过OnClickListener监听接口触发onClick事件,实现用户需要的功能。
具体实现
1 | package com.lptexas.myapplication; |
具体步骤
- 调用接口——添加”implements <接口> …”
- 定义widget组件
- 将xml中的标签与widget组件关联
- 设置事件监听接口——在此处我们需要监听点击“登录按钮”,故使用onClickListner这个接口
- 重写onClick方法
补充
Toast消息提示框
Toast为当前视图显示一个浮动的显示块,但不会获得焦点。
Toast提供两个静态方法,他们会返回一个Toast对象,若需要显示,只需要调用show()方法即可。
方法
1 | static Toast makeText(Context context,int resld,int duration) |
text: 指定消息的来源。可以指定String资源,使用<string.…/>标签在XML资源文件中
定义,还可以指定一个字符串用于消息展示。Duration: 设置Toast的持续时间,一般使用Toast自带的两个整形的常量:
LENGTH LONG (1,时间稍长) 、LENGTH_SHORT (0,时间稍短) ,针对不同的使
用场景,选择不用的持续时间。Toast消息的默认显示位置在屏幕的中间偏下,使用setGravity(int gravity int xOffset
int yOffset)方法可设置Toast消息的位置,它有三个参数,gravity设置一个重力方向,
另外两个设置水平和垂直方向的偏移量。1
static Toast makeText(Content context,CharSequence text,int duration)
Context: 上下文对象,
resld: 用于显示的消息来源,
Duration: 设置持续时间。
进度条ProgressBar
用于显示一个过程
类型
- 默认ProgressBar
- 圆形进度,不停的转圈,不显示具体数值
- 横向ProgressBar
- 显示横向进度,设置ProgressBar的Style为
style="?android:attr/progressBarStyleHorizontal"- 属性
- max:指定进度条总进度值
- progress:设置当前进度值,即初始进度值
- secondaryProgress:指第二进度值(缓冲进度)
- 属性
- 显示横向进度,设置ProgressBar的Style为

单选组件与复选组件
单选组件RadioGroup
一个程序中可有一个或多个RadioGroup,它是RadioButton的承载体。
一个RadioGroup中可有一个或多个RadioButton,它是仅可以选择一项的单选组件。
复选按钮CheckBox
复选按钮是Button的子类,其属性和方法继承于按钮Button。
ListView类
ListView是一个比较常用的控件。它以列表的形式 展示具体数据内容,并且能够根据数据的长度自适应屏幕显示。
该组件必须与适配器配合使用,由适配器提供显示样式和显示数据。
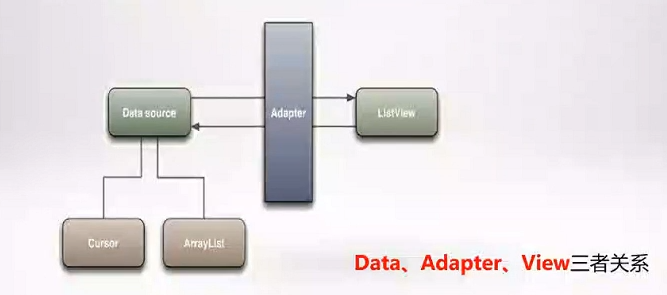
常见的适配器
BaseAdapter是一个抽象类,继承它需要实现较多的方法,所以也就具有较高的灵
活性;ArrayAdapter支持泛型操作,最为简单,只能展示文字。
SimpleAdapter有最好的扩充性,可以自定义出各种效果。
ArrayAdapter
使用ArrayAdapter来装配数据,连接 ListView 视图对象和数组来装配一批数据。
ArrayAdapter的构造需要3个参数,依次为this、Listltem布局文件(注意是列表每一行的布局) 、数据源 (一个数组集合) 。
Android系统内置了多种Listltem布局方式。
- android.R.layout.simple list_item_1: 一行text。
- android.R.layout.simple list_item_2: 一行title,一行text。
用setAdapter()完成适配的最后工作。
示例
列表的显示需要三个元素:
- ListVeiw: 用来展示列表的View。
- 适配器: 用来把数据映射到ListView上的中介。
- 数据: 具体的将被映射的字符串,图片,或者基本组件。
OnltemclickListener是一个接口, 用于监听列表组件选项的触发事件。
可以用Toast.makeText().show()显示信息
具体实现
对应
ListViewActivity&activity_list_view
1 | package com.lptexas.myapplication; |
1 |
|
与列表(项)交互
第一种:OnItemClickListener listener1; //单击Item时调用
第二种:OnItemSelectedListener listener2; //选中Item后调用
ListActivity类
与普通Activity区别不大,只是实现了一些封装。做了许多优化,方便显示列表信息。
ListActivity类继承于Activity,默认绑定了一个ListView组件,并提供一些与ListView处理相关的操作。
默认继承的是AppCompatActivity类。还可以直接从Activity类继承。
常用方法
getListView():返回绑定的ListView组件。
Activivty与Intent
Activity基础
Activity是Android中最基本的组件,显示可视化的用户界面,接受与用户交互所产生的界面事件。
Activity生命周期
从启动到销毁的过程
四种状态
运行状态(Active or Running)
界面位于最上层,完全能被看见,可交互。
暂停状态(Paused)
界面被部分遮挡,可见但不拥有焦点,不能交互。(此时保留所有的状态和成员信息并保持与ctivity管理器的连接,当内存不足时,这个暂停状态的Activity可能被kill)
停止状态(Stopped)
界面被全部遮挡,完全看不见,不能交互。(仍然保留当前状态和成员信息,如果内存不足这个Activity很容易被kill)
销毁状态(Killed)
进程终止、Activity从栈中移除,需要重新启动才可以显示和使用。
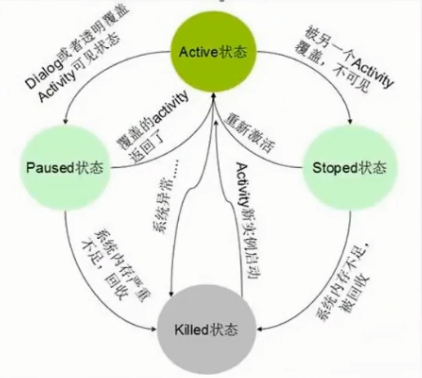
Activity的四种状态转换关系图
当我们从一种状态切换到另一种状态时会触发一些事件,执行一些回调函数(方法)
回调函数
Activity 生命周期的事件回调函数
| 函数 | 是否可终止 | 说明 |
|---|---|---|
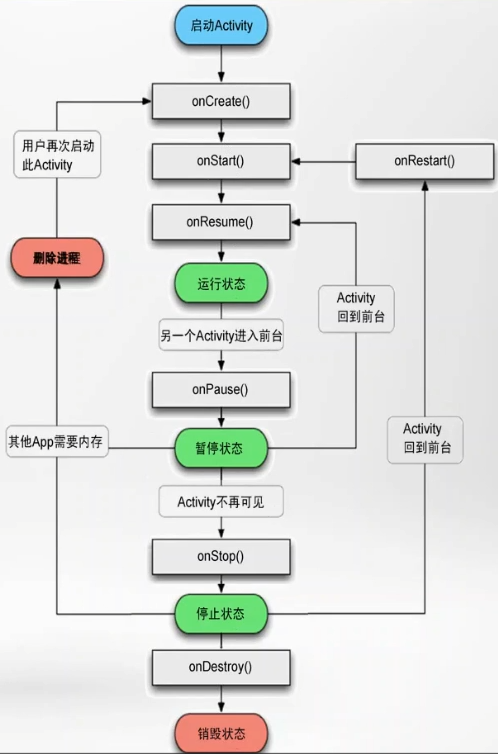
| onCreate() | 否 | Android 启动后第一个被调用的函数 > 常用来进行 Activity 的初始化(如创建 view、绑定数据、恢复信息等) |
| onStart() | 否 | Activity 显示在屏幕上时,该函数被调用 |
| onRestart() | 否 | Activity 从停止状态进入活动状态前,调用该函数 |
| onResume() | 否 | 当 Activity 可以接受用户输入时,该函数被调用 > 此时的 Activity 处于 Activity 栈顶 |
| onPause() | 否 | Activity 进入暂停状态时,该函数被调用 > 主要用来保持持久数据、关闭动画、释放 CPU 资源等 > 该函数必须简短,因为另一个 Activity 必须等待该函数执行完毕后才能显示在界面上 |
| onStop() | 是 | 当 Activity 不对用户可见后,该函数被调用,Activity 进入停止状态 |
| onDestroy() | 是 | Activity 被终止(进入非活动状态)前,该函数被调用 > 程序主动调用 finish () 函数或程序被 Android 系统终结 |
Activity 状态保存 / 恢复的事件回调函数
onSaveInstanceState () 和 onRestoreInstanceState () 函数不属于生命周期的事件回调函数,onSaveInstanceState () 在 Activity 被暂时停止时(或被其他程序中断或者锁屏)被调用,而 Activity 被完全关闭时(调用 finish () 函数)则不会被调用。当暂停的 Activity 被恢复时,系统调用 onRestoreInstanceState () 函数。
onSaveInstanceState () 函数会将界面临时信息保存在 Bundle 中,onCreate () 函数和 onRestoreInstanceState () 函数都可以恢复这些保存的信息。一般简化的做法是在 onCreate () 函数中恢复保存数据,但有些特殊情况还是需要使用 onRestoreInstanceState () 函数恢复保存信息。如必须在界面完全初始化完毕后才能进行的操作,或有子类来确定是否采用默认设置等。(存疑)
| 函数 | 说明 |
|---|---|
| onSaveInstanceState() | 暂停或停止 Activity 前调用该函数,用以保存 Activity 的临时信息 |
| onRestoreInstanceState() | 恢复 onSaveInstanceState () 保存的 Activity 状态信息 |
Activity的相关要素
Activity在使用之前需要在AndroidManifest文件中,注册Activity。
AndroidManifest相当于一个手册文件
使用Android SDK工具创建新的应用程序,会自动创建Activity的意图过滤器
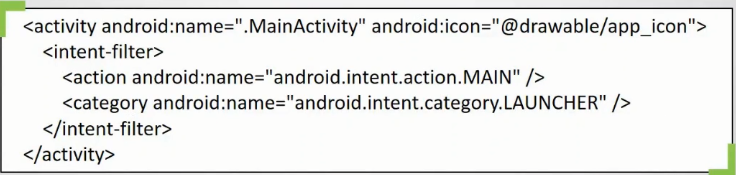
android:name 属性是唯一必须的属性,它用来指定Activity的类名。
<action>节点用来指定Activity的主入口行为
- 类似c语言的main(),即程序运行时先执行的地方
<category>指定了该Activity的应用程序中允许用户启动这个Activity
- 也就是说当前Activity会不会在手机上产生一个图标
Activity与布局之间的关系
在Activity的onCreate()方法中调用setContentView()方法来指定Activity显示的内容,也就是指定Layout文件。
这种分工把设计用户界面和编写Activity代码这两件工作很好的分化开来。
Activity与View之间的关系
- View对象
- 用户界面由View类派生的view对象分层次结构提供。每个view在Activity的窗口中控制了一个特定的矩形空间,能够接收相应用户的交互操作。
- findViewById()方法
- 在Activity中调用findViewById()方法可以获取控件的对象,在通过这个对象去设置控件的属性,随时修改控件的属性。
Intent与数据传递
Intent介绍
“意图”,它是一种运行时绑定(run-time binding)机制,可以应用于两个应用间的通讯交互,也能够应用于在同一个应用下不同组件的交互(activity、service、broadcast receiver)
用于页面切换,传递数据,调用外部程序。
Intent的属性
Action动作(常用)
Action属性的值为一个字符串,它代表了系统中已经定义了一系列常用的动作。通过setAction()方法或在清单文件AndroidManifestxml中设置。默认为: DEFAULT。
Intent.ACTION_MAIN : 应用程序入口。
Intent.ACTION_SEND: 发送短信、发送邮件等。
Intent.ACTION_VIEW: 显示数据给用户,如浏览网页、显示应用、寻找应用等。
Intent.ACTION_WEB_SEARCH : 从谷歌搜索内容。
Intent.ACTION_DIAL: 拨打电话。
Intent.ACTION_PICK: 打开联系人列表。
Data数据
- Data通常是URI格式定义的操作数据。例如: tel// 。通过
setDatal()方法设置。
- Data通常是URI格式定义的操作数据。例如: tel// 。通过
Category分类
- Category属性用于指定当前动作 (Action) 被执行的环
境。通过addCategory()方法或在清单文件ndroidManifestxml中
设置。默认为: CATEGORY_DEFAULT。
- Category属性用于指定当前动作 (Action) 被执行的环
Type类型
Compent组件
Extra拓展
- Extras属性主要用于传递目标组件所需要的额外的数据。通
过putExtras()方法设置.
- Extras属性主要用于传递目标组件所需要的额外的数据。通
多Activity
如何实现点击一个按钮跳转到另一个Activity?
对按钮onClick事件进行处理
1 | public viod onClick(View v){ |
- Intent()构造函数参数介绍
- Content上下文:application(全局上下文)、自定义Context、当前Activity(使用this就行)。
- 目标activity:可以为activity、service等
显式Intent与隐式Intent的区别
- 显式Intent
- 通过组件名指定启动的目标组件,比如startActivity(new Intent(A.this,B.class)); 每次启动的组件只有一个
- 隐式Intent
- 不指定组件名,而指定Intent的Action,Data,或Category,当我们启动组件时, 会去匹配AndroidManifest.xml相关组件的Intent-filter,逐一匹配出满足属性的组件,当不止一个满足时, 会弹出一个让我们选择启动哪个的对话框
- 系统根据信息进行分析,寻找目标Activity,以及各种系统功能的调用,如:调用浏览器(访问网页),那到底是哪个浏览器呢?
- 不指定组件名,而指定Intent的Action,Data,或Category,当我们启动组件时, 会去匹配AndroidManifest.xml相关组件的Intent-filter,逐一匹配出满足属性的组件,当不止一个满足时, 会弹出一个让我们选择启动哪个的对话框
Bundle类及应用Intent传递数据
Bundle类是用于为字符串与某组件对象建立映射关系的组件。
Bundle组件与Intent配合使用,可在不同的Activity之间传递数据。
Bundle类的常用方法如下。
- putString(String key,String value): 把字符曲用“键值对”形式存放到Bundle对象中。
- remove(String key) : 移除指定key的值
- getString(String key): 获取指定key的字符

基本框架
具体实现
只给出重写方法中的内容
1 | //传递数据 Bundle存储、Intent跳转 |
目标界面()
1 | Bundle bundle = this.getIntent().getExtras(); |
比较Intent中,putExtra()和putExtras()的区别
putExtra()
设置方法
putExtra(“A”,B)中,AB为键值对,第一个参数为键名,第二个参数为键对应的值(这里的B为变量,也可以直接用值“B”)。
1 | public Intent putExtra (String name, double[] value) |
使用方法
想取出Intent对象中的这些值,需要在你的另一个Activity中用get<数据类型>Extra()方法,注意需要使用对应类型的方法,参数为键名。
putExtras()
1 | public Intent putExtras (Bundle extras) |
设置方法
1 | Bundle bd=new Bundle(); |
使用方法
1 | Bundle bd=this.getIntent().getExtras(); |
对比Manifests中的AndroidManifest与apk中的AndroidManifest
build一个apk
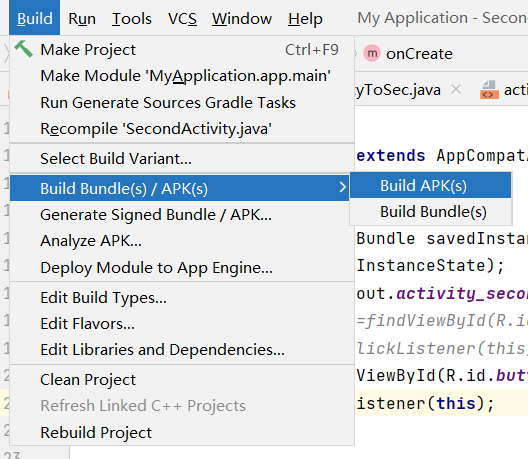
apk的路径为
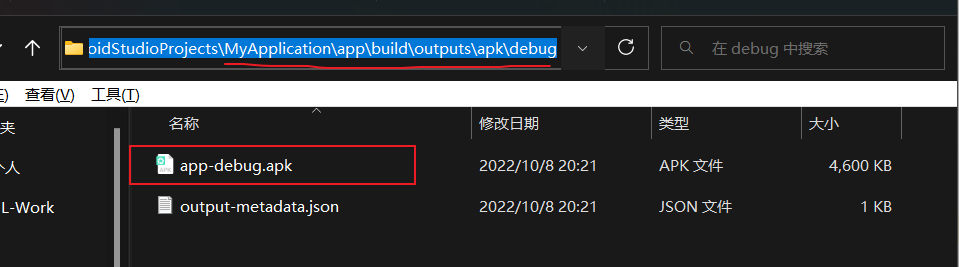
分析apk
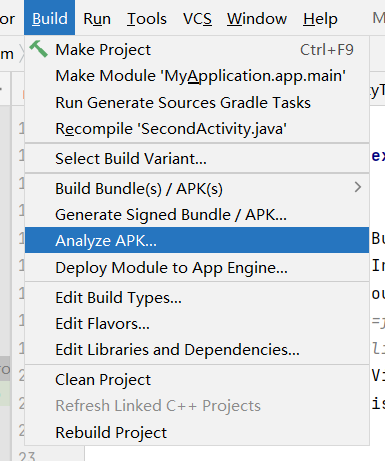
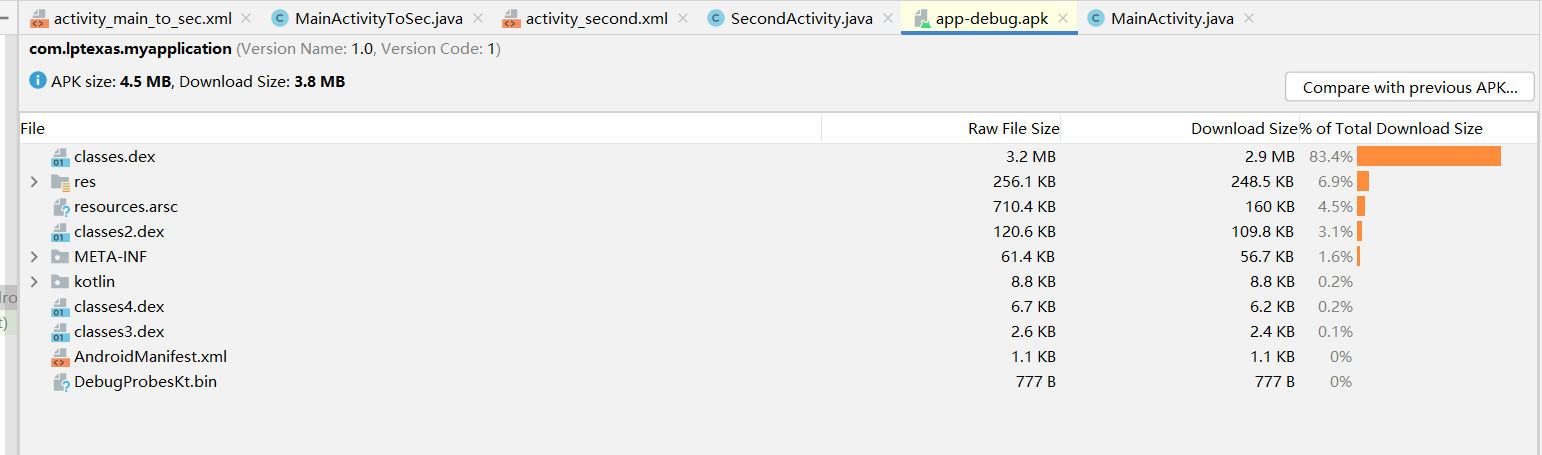
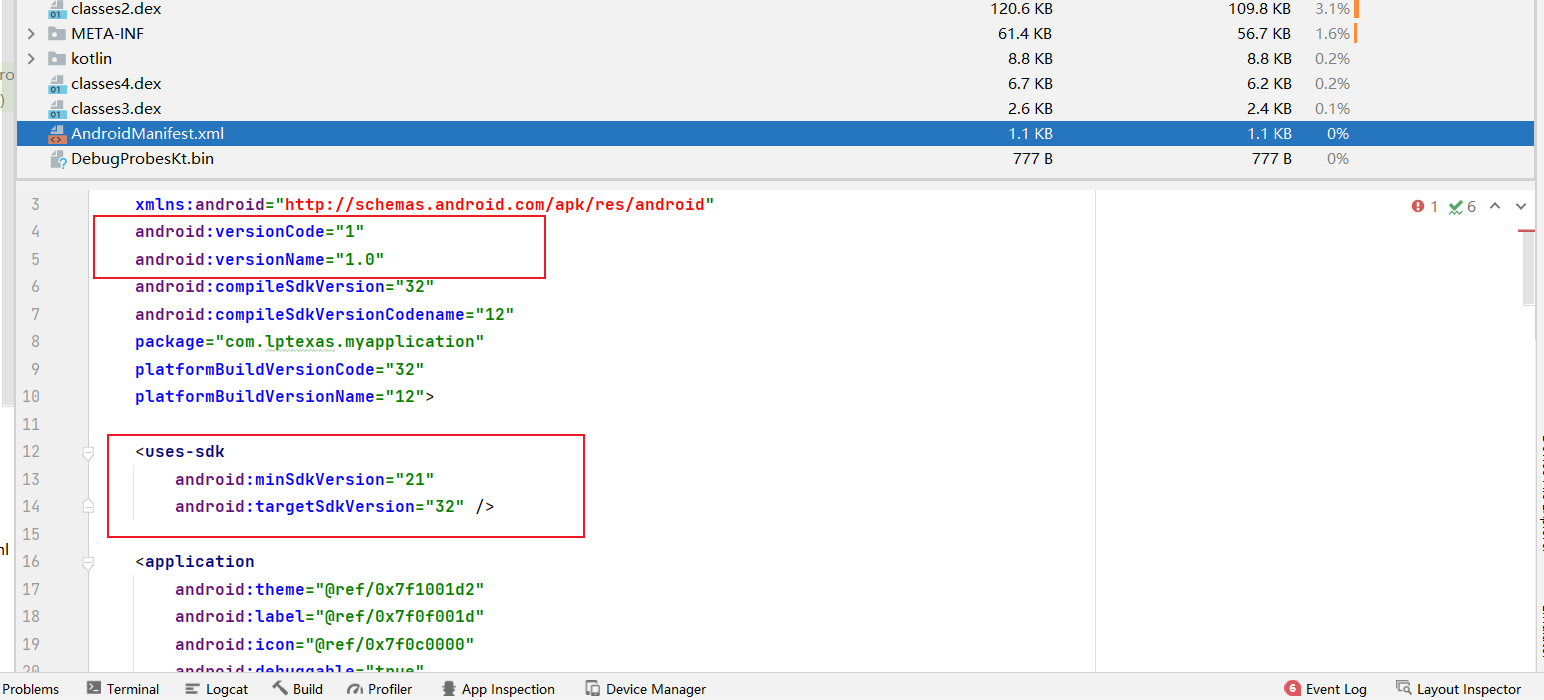
对比我们发现apk中与我们manifests中的有些许不同,如上框中的内容没有在manifests的AndroidManifest中。
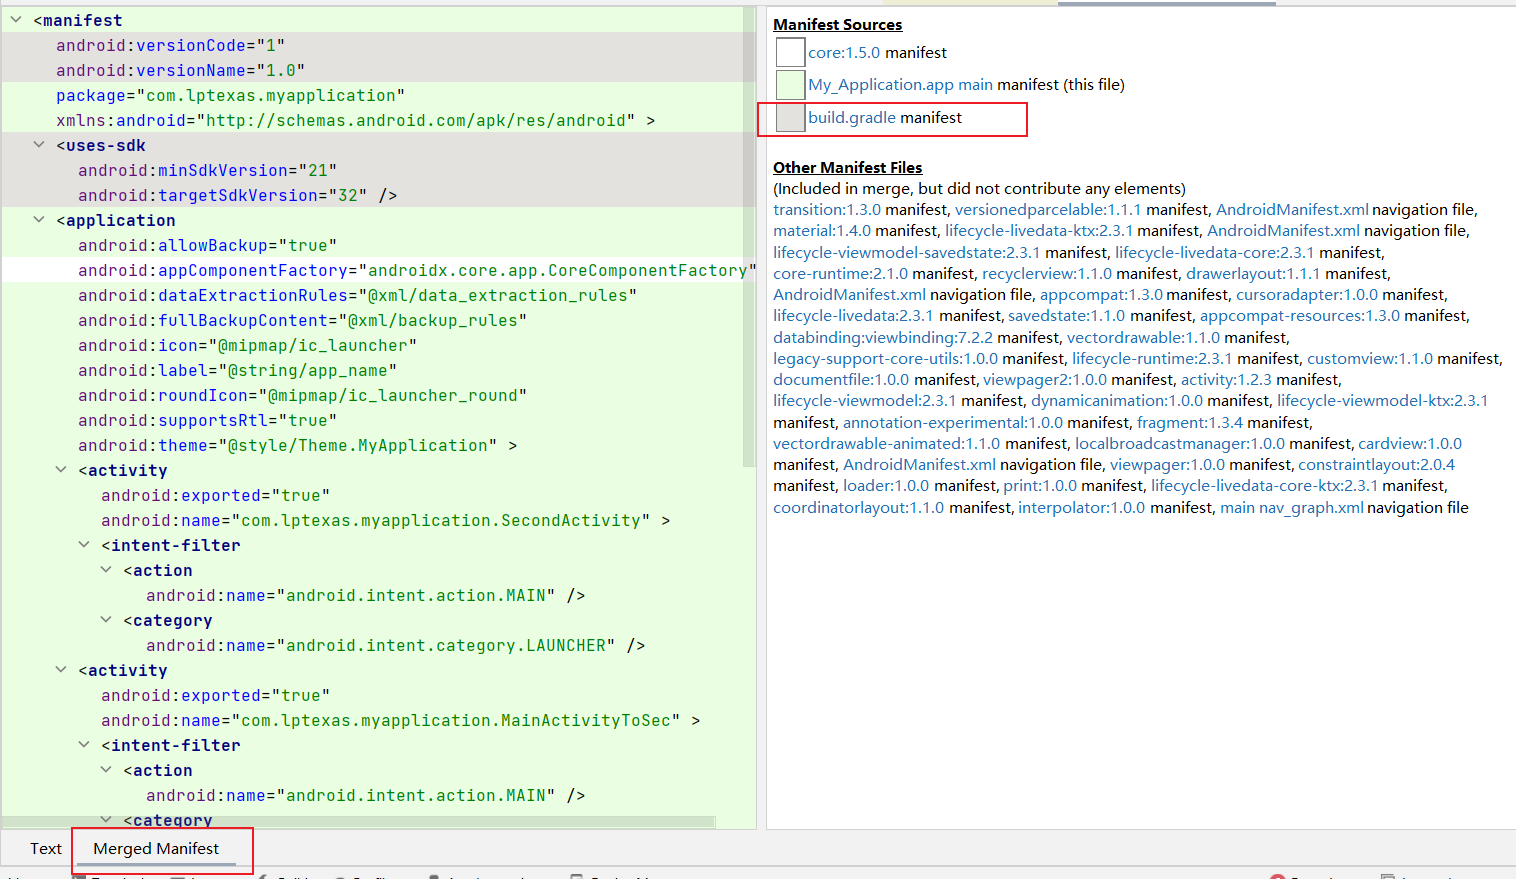
我们可以直接在manifests的AndroidManifest,点击下方的Merged Manifest直接可以看到编译成apk后的AndroidManifest。
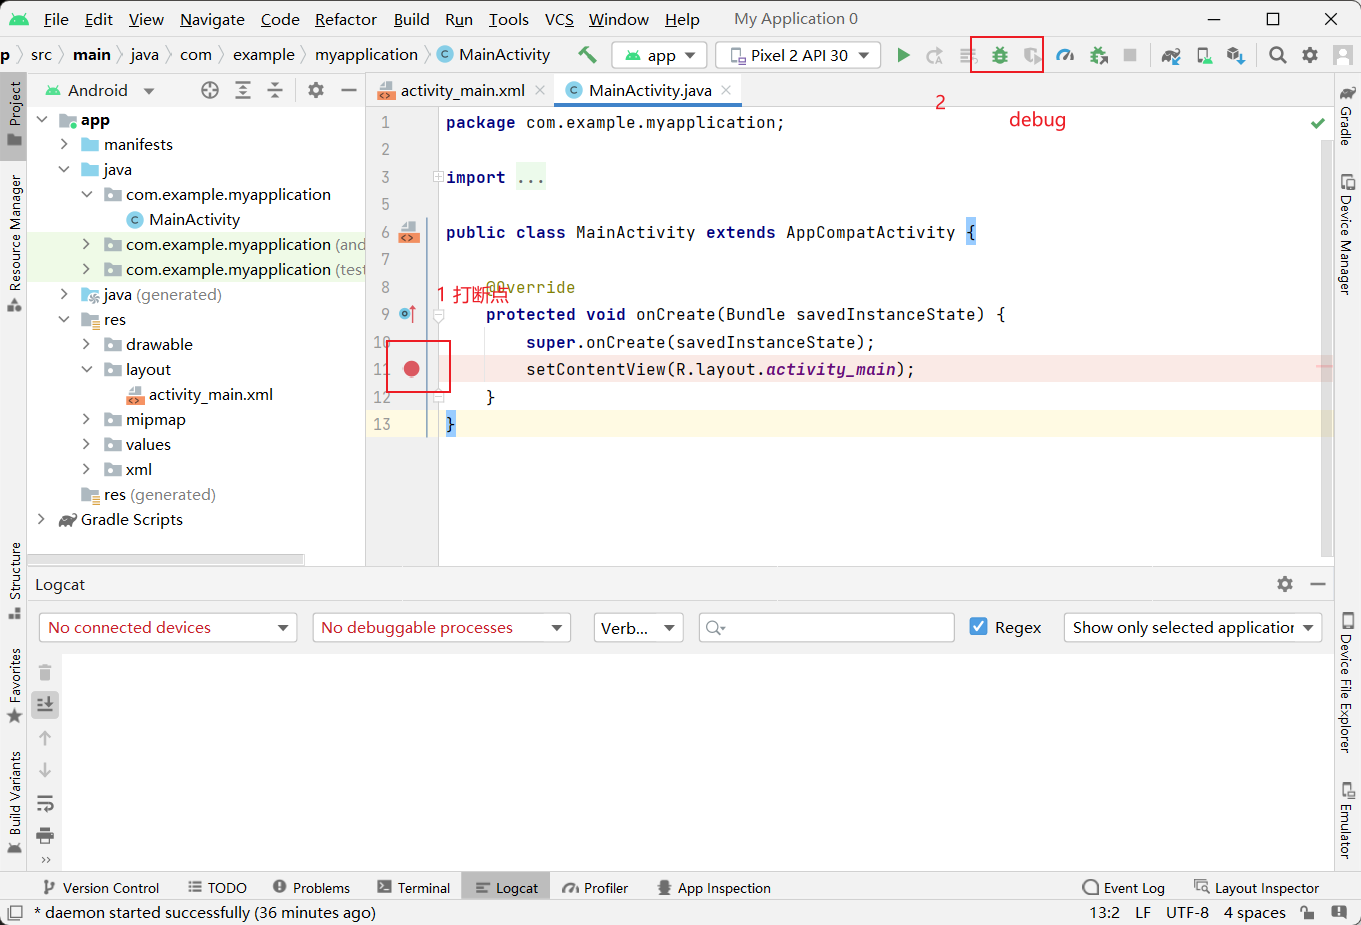
调试
程序调试Logcat
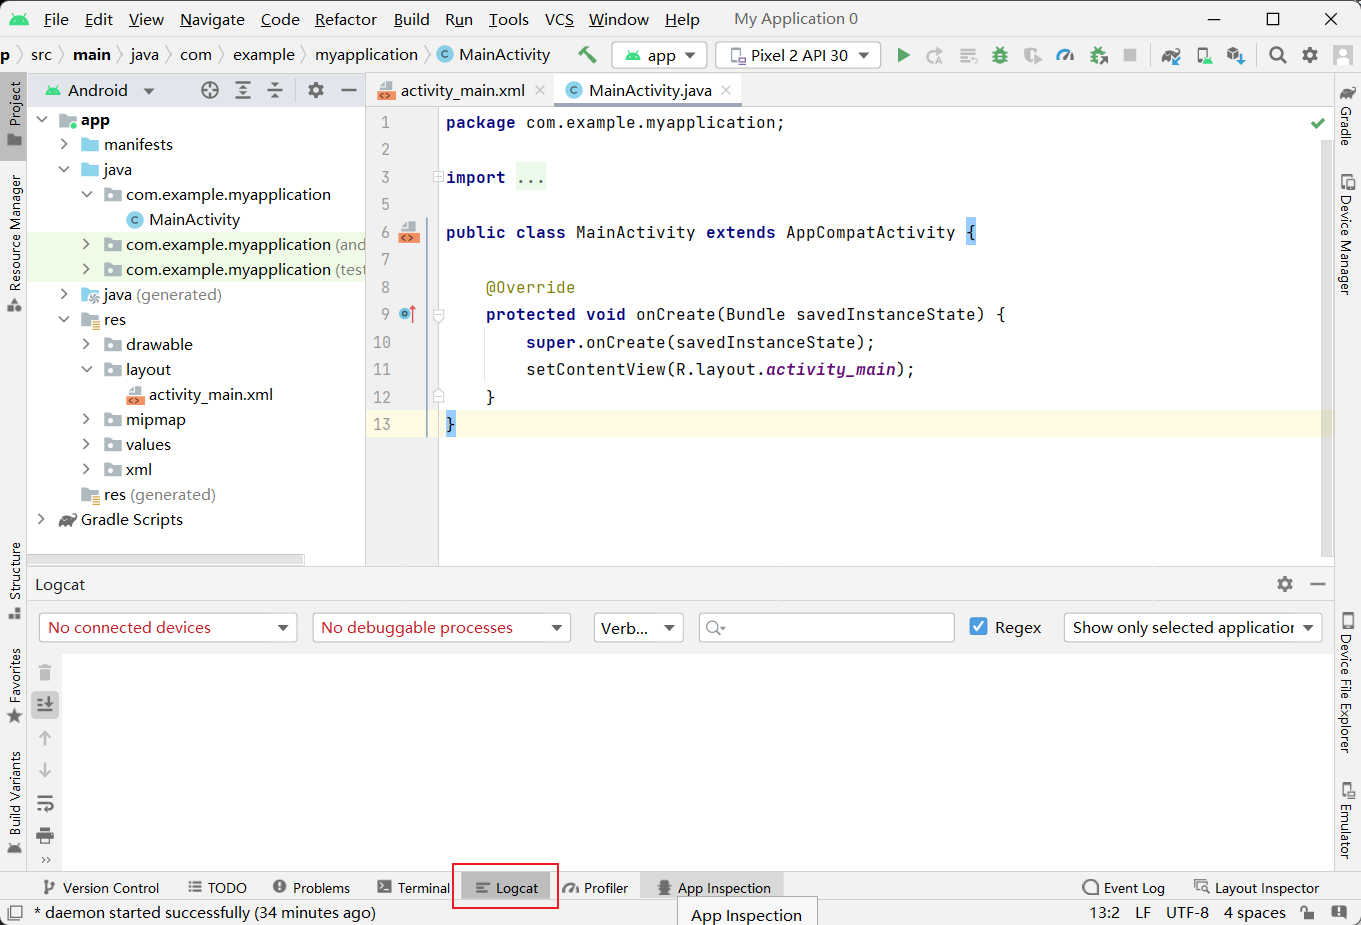
打断点
 Wechat
- Alipay